Tuesday, February 3, 2015

Candle Holder Cookie Tray


This project was something I've wanted to try for a while. I really wanted to do something like this as dessert trays for my wedding. The few times I went to the thrift store last spring I wasn't able to find the right plate or I couldn't find a candle holder that was heavy enough. By chance, a couple months ago, I found two silver candle holders with a nice base and some decent weight to them. Not too far away, on the same shelf, I found matching China with a pretty blue flower pattern.

I used my hot glue gun on high heat for this project. The truth is I had a "win" and a "fail". I was able to get one of the plates to stick to the candle holder and maintain a grip. The other one wouldn't no matter how many times I tried. (Good thing about hot glue is if it won't stick it's pretty easy to peel off.) 

I'm not really sure what the solution is... possibly gorilla glue? or super glue? If I ever find the time I'll try it again. If this project interests you there are lots of other "pins" on Pinterest that might be able to provide additional insight.

Sunday, January 18, 2015

Valentine's Day Cards


I warn you in advance that this is going to be an entry where I gush about how proud I am of Crafty Kid. Everything you see in this entry she made herself, from start to finish, with no help from any adults. 

I was out all day yesterday and came back to find these beautiful cards and a wonderfully laid out crafting work area. Talk about being impressed! She even had my 13-year-old stepson helping her because she showed him how to use the Cuttlebug embosser and he loved it. If that isn't enough, today I showed her how to use Photo Grid and she made the collage image you see above for the blog :)


As you can see she had her crafting area laid out nicely. The biggest problems any crafter faces is the issue of time and space. Nobody wants to waste a lot of time setting things out or cleaning them up. Or waste even more time digging through things to find what they need. And most people have to use their kitchen table (like we do) and so you have a limited work space. I taught her to create work stations for the cards so that she knows where everything is and can easily go from one step to the next. 

She set up the following stations: Paper, Cutting, Embossing, Gluing, Embellishments, and Stamping. Everything was laid out on the kitchen table lining the perimeter, like a horseshoe, and she worked off of the clear space in the center.


Obviously taking time to set up was not her favorite thing in the beginning. She just wanted to get right down to crafting, and this always left a big mess. Scissors lost under paper, embellishments on the floor, no table space when you needed to emboss. Of course that lead to frustration, and let's face it, at 11 you kind of just give up on it at that point. I was then stuck cleaning up everything to make sure it got back in it's place, which could take up to 30 minutes. (Again, goes back to knowing where things are so you don't waste time digging through everything.)

So this breakthrough she had is a big win for everyone! She's productive and happy making the cards, and it took me all of 5 minutes to get everything back where it belonged the next day.


As far as card design, it was her idea to buy the doilies a few months back. Look at how creative she was with using them! I was also super impressed that she mixed and matched so many techniques. (Layering paper & doilies, stamping, embellishments, embossing, shape punching)

Making these cards takes time and patience. I'm proud of her for following through with her creativity and learning at the age of 11 how important it is to be organized.

Wednesday, January 7, 2015

Holiday Ornaments: Part 2

So the Holiday season has come and gone yet again. I may have been quiet on the blog the last few weeks, but we sure have been busy crafting, party planning, and decorating! I'll have lots to share in the coming weeks.

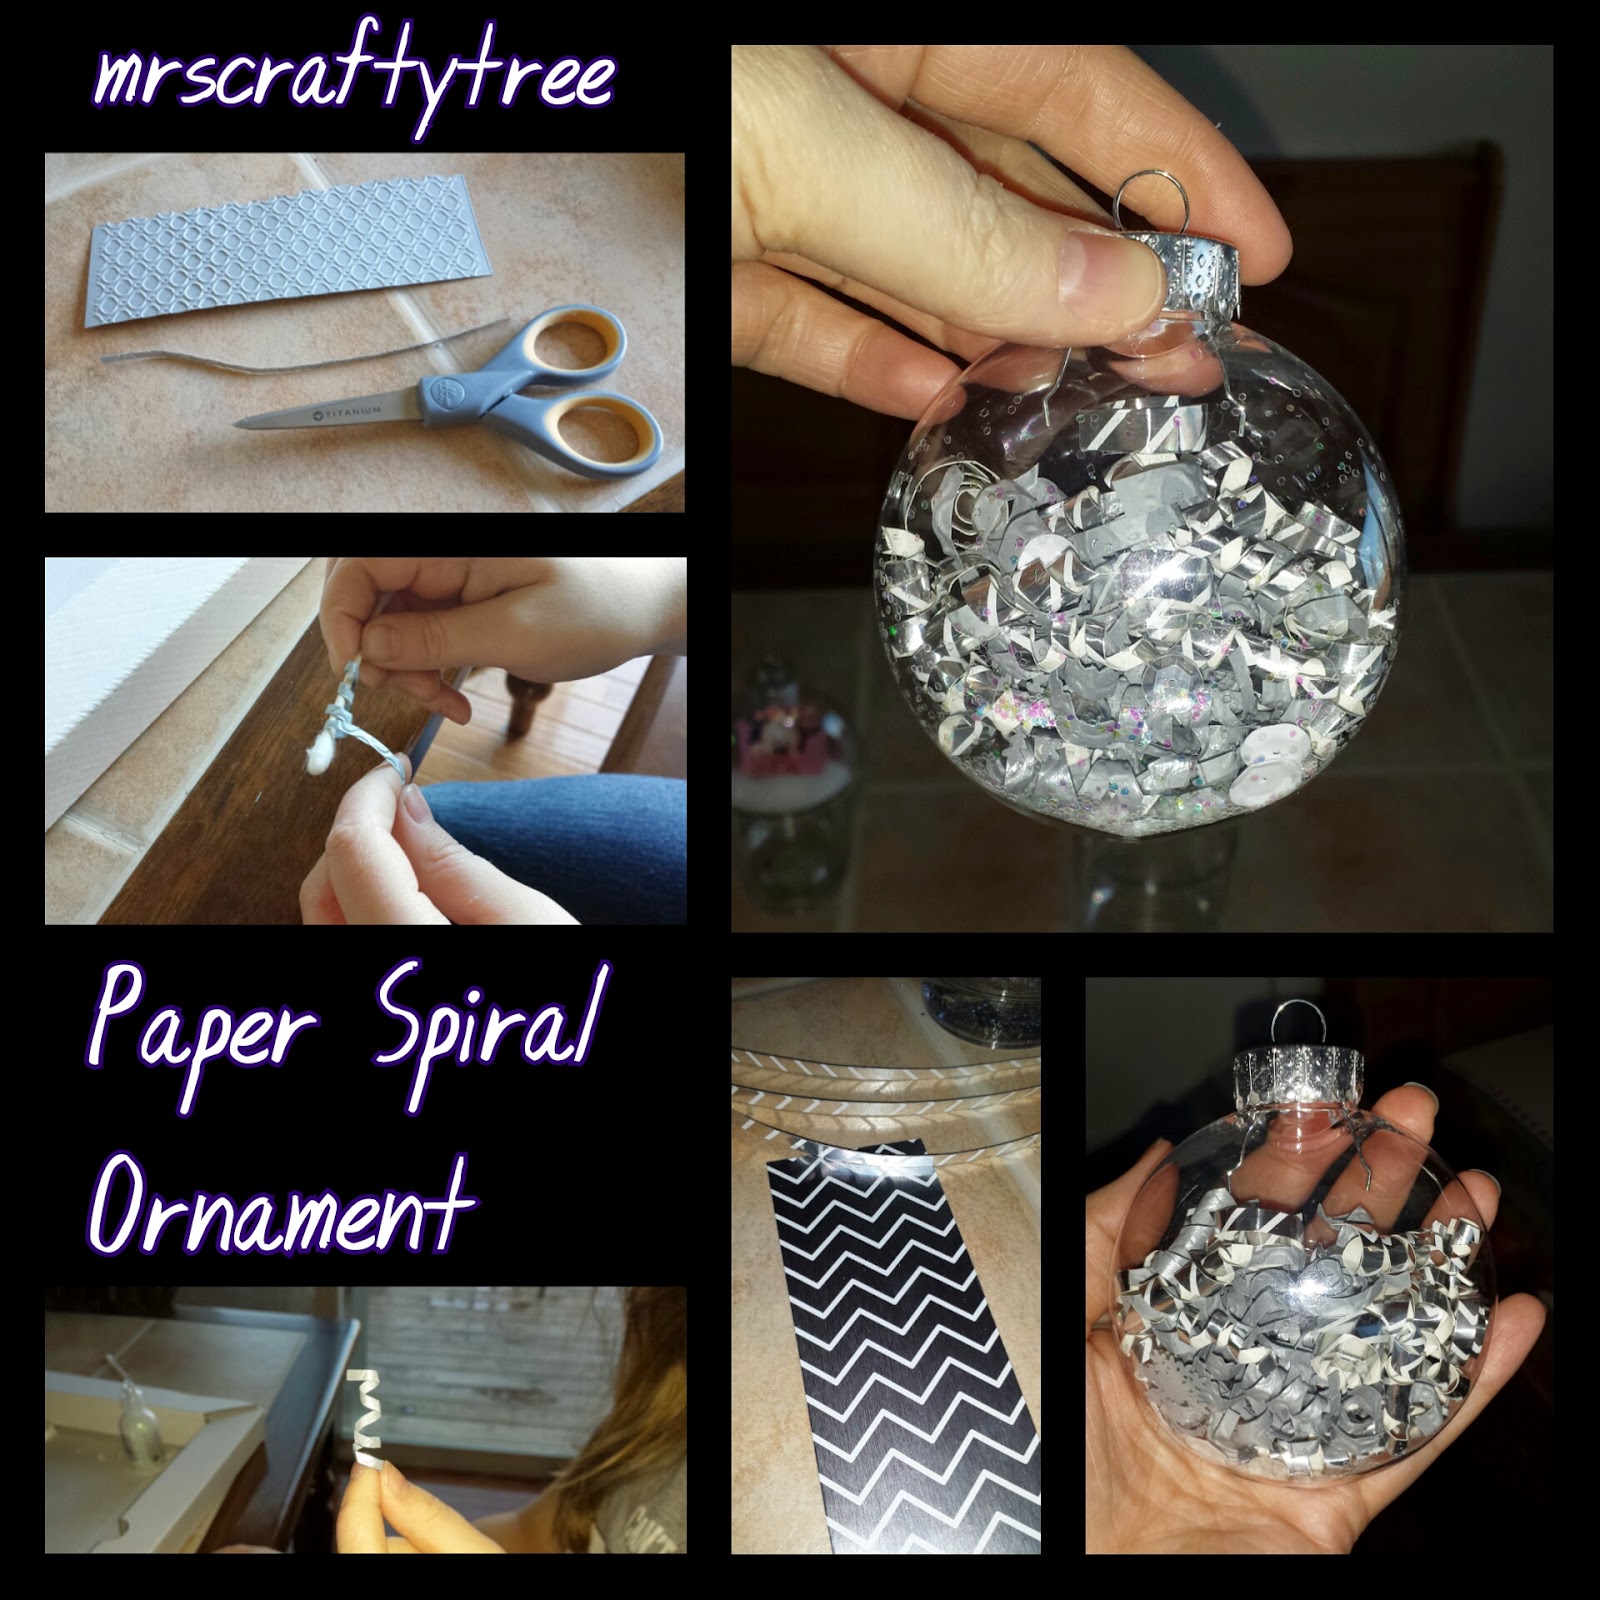
I figured it would be best to start with the second half of our ornament project. I had held back on blogging about them because the Disney themed ones were a gift for my family. Crafty Kid had a great time making these and I was glad I came up with the idea because they were easy to make as well. We really loved making the spiral paper ornament! It was a lot of fun to do and such a beautiful result.

For this craft you will need the following:
  • Double sided scrapbooking tape
  • Mickey scrapbooking paper (or character of your choice)
  • Paper Slicer or sharp scissors
  • Q-Tip or a pencil
  • Styrofoam or Epson salt (if you want to add "snow")

The first round of ornaments Crafty Kid and I were having trouble deciding what looked best inside the ornament. Some of our issues were that in order to get bulkier items to stay we needed glue, which was difficult to use due to the small opening on the top of the ornament. The paper items often just fell on their side and again gluing them to the wall of the ornament was a bit of a process. Not to mention only one side of the paper had a print on it so if it flipped over it just looked like white paper.


We had some scrapbook paper with larger sized Disney character faces on it, and luckily before we went to use it I had a breakthrough. I realized we could glue two of the characters together so there was a design on both the front and the back. In the ornament above we cut out two of the Mickey faces and glued them together with double sided tape. Then we rounded off the edges with a small, sharp pair of scissors.


We then put the double sided Mickey paper inside the ornament. We were super happy to see it stood up inside the ornament. We had some packing styrofoam I saved, so we broke it into pieces to put inside the ornament to create a snow globe effect. Crafty Kid really LOVES her glitter glue so she put some drips of it on the outside of the ornament.


For the Minnie and Pluto ornaments above we followed the same initial steps. Once the Minnie paper was inside the ornament we used Epson salt as snow and Crafty Kid dotted the top with white glitter glue. For the Pluto ornament she decided she wanted to dot the entire ornament and leave just the Pluto paper inside.


This ornament above is hands down my favorite! We were messing around with some smaller strips of scrap paper and came up with the idea to spiral it. I showed Crafty Kid that she could use a Q-Tip to roll up the paper and she ran with it! We used a couple different shades of silver paper. I cut the thin strips and she rolled them up. Some we stuck inside at that length, others we cut to different lengths. It came out so pretty.

Note: We put some glitter and flat white gems inside. I don't think it's necessary. You can barely tell unless you look very closely at the bottom, which is where they sank to. That's the beauty of the paper is it's so light as a spiral it has a floating effect.


So as promised from my previous Holiday Ornaments: Part 1 blog, above is my melted snowman Pinterest fail. Mine, of course, is the one in the right hand corner. Honestly it doesn't look as bad as I remember, but it still wasn't as cute as what I saw on Pinterest. 

Just goes to show that not all craft projects are as easy to replicate as you think. That's why when I blog I do my best to go step by step. I hope it's helping those reading with some ideas and inspiring you to craft on!

Saturday, December 20, 2014

Holiday Magnet Name Cards


This was a craft I made to enhance favors for our Holiday Party at work. The only thing I had to purchase was the magnets for the back. I figured if I was going to spend 4 hours making 30 place card name tags I could at least make them a reusable item :)

You will need:

  • Scrapbooking Paper
  • Decorative Scissors
  • Crafting Glue or Double Sided Tape
  • Regular Scissors or Paper Slicer
  • Snowflake Punch Out
  • Snowflake Brads (if you want)


All of the name cards I made had slight differences. I am just going to show you an example of two different ones. For all of them I used my paper slicer to cut the base paper out, and used the backs of scrap paper for the center piece, which I wrote the names on. The one above I punched out 4 snowflakes and used the scraps as well. I glued all the pieces together using crafting glue that dries clear. 


For this one I used 3 pieces of paper that I layered on top of each other. Again I used the crafting glue. I also used the decorative scissors to create a fun edge. For an added touch I put 2 snowflake brads on the corners.


The final touch was to add an adhesive magnet to the back. I bought a 25ft roll and have plenty left over for other projects. Although this is a simple craft I do have a few tips:

  • I found it easiest to stick with the 3 layered look. I just switched up which papers I was putting together. It was fun to play around with different patterns.
  • I liked the common theme of them all having paper snowflakes. I only used the brads on my example.
  • The decorative scissors really gave them a nice finish. You can even cut it to make decorative edges. (Which you can see in the right corner of the picture above)
  • BIGGEST TIP:  I found it was much easier to use double sided scrapbooking adhesive. I use the permanent kind and it sticks together really well. Plus it saves you from waiting for the glue to dry.

Sunday, December 7, 2014

Corkboard Picture Frames

A couple of months ago Crafty Kid was with me at Michaels and we picked up a bunch of raw cork for a school project she was working on. It was marked down 60% and I figured I would eventually find a use for it. Flash forward to a couple weekends ago, my sister was in and we went to the Salvation Army. I found a bunch of picture frames between $.50 and $1 a piece. Score! I knew immediately that I could make some pretty cute framed corkboard memo/keepsake holders.

Supplies needed for this project:
  • Raw Cork Pads (4x4 size used here)
  • Picture Frames
  • Cardboard 
  • Crafting Knife (exacto)
  • Hot Glue Gun


First thing I did was take out the glass in the picture frame. (Consider keeping it for future projects if you have the room to store it.) I then took a cardboard box and cut it to the size of the frame since this is what you are going to glue your raw cork on to. Make sure to put the unmarked side of the cardboard facing up because the color closely matches the raw cork. Close the back of the frame up. Now you can start to space out your raw cork.


I glued a solid 4x4 square of the raw cork in the top corner with hot glue. From there I started to measure out the pieces that would fill in the rest of the space on the cardboard. I have no tip or trick here. I just eyed it up and tried to be precise. The crafting knife cuts the raw cork nicely. I scored it and then gently cracked the raw cork in half. I then used the crafting knife to clean up the cut edge. I glued these pieces into place until all of the cardboard was covered.


As you can see above they turned out nice! Don't worry about small gaps in the cork puzzle pieces you've now connected. The cardboard underneath is such a close color you can barely tell. Also, if you are truly using these for their intended purpose they will soon be covered in memos, pictures, and keepsakes.

I think this could make a great gift as it can be utilized in both your home or at the office.

Friday, November 28, 2014

Season's Greetings and Christmas Cards


Crafty Kid got an offer to have her cards in a local store. She's SUPER excited. I'll show you the cards we worked on the other day below and talk more in depth at the end about our new adventure.

For this project we used the following:
  • Cards
  • Scrapbooking Paper (Holiday Themed)
  • Decorative Scissors
  • Crafting Glue or Hot Glue (we used a glue gun)
  • Snowflake Punch Out
  • Scissors or Paper Slicer


For the two cards above it was really simple. We used the paper slicer to cut the scrapbook paper. Then Crafty Kid used the decorative scissors for a more interesting edge. We had some scrapbook paper that had holiday phrases on it so we cut those out as well. Then we hot glued the cut outs onto the card. (Use the glue of your choice to adhere it.)


We used silver star brads for the card above. Taking the tip of a sharp scissor we made a small puncture in the card. We put the star through and bent the flaps through on the other side. Then we glued the cut out holiday phrase scrapbook paper onto the card. 


This one above I had so much fun with. We had scraps of paper left over from other cards and cut them into different stacking block shapes to make a tree. For a finishing touch we put a punched out snowflake as the star. The Merry Christmas card on a polka dot green background seemed like a nice modern twist for a holiday card.

*****************************************************************

Ok. So back to the entrepreneur adventure.... There have been a lot of talks in our house as to what to make, how much to sell it for, and how much work goes into it. I'm proud of her, and I think this opportunity will help her understand things from a business perspective. I want her to be aware of the time, energy, and money being put into the creation of the cards, but at the end of the day I just want it to be fun. I think it will make her appreciate what it takes to be a hard worker.

She's already mentioned to me that sometimes she just doesn't "feel like" crafting. She also said that sometimes she doesn't feel like she does enough. (For example I hot glue all the pieces because our new glue gun heats up to 380F. Very effective. Not so good for kids.) I remind her that she is the creativity behind the crafts, and to be excited she has naturally intuitive vision when it comes to things of an artistic nature. (She draws and paints in addition to what we work on.) I've explained to her that the construction of the craft can be improved through repetition, and that her creativity will only expand as she uses it. Bottom line is to have fun and spend time together. I think she gets it. She's a smart kid after all.

We'll be sure to keep you updated!

Monday, November 24, 2014

Holiday Ornaments: Part 1

It's that time of year to make the Christmas ornaments. This is the third year the kids will make homemade ornaments for the family. I have to admit the two prior years I picked the projects and I kept it simple and fun. This year with Crafty Kid being so interested in crafting I let her help me pick out items at Michael's that we would use to decorate and fill our ornaments. I have to take advantage of what little time is left where I am "cool step-mom" and she wants to spend hours on end with me seeing where our creativity will take us.

Below are a list of items we picked up to use. Other than the ornaments themselves this is just a suggested list of decorative items you can use:

  • Ornaments (plastic is best for kids to work with)
  • Punch outs (Star, Snowflake, Heart)
  • Scrapbooking paper
  • Glitter
  • Epson salt (looks like snow!)
  • Crafting glue (dries clear)
  • Glitter glue (silver, gold, & white)
  • Embellishments

We chose clear plastic ornaments that were flattened so the items didn't have as much room to move. However round, square, or any size plastic fillable ornaments would work for (most of) these projects.

I had found some Mickey Mouse scrapbook paper on sale for $.07 and thought it would be fun to use different punch shapes with this paper. I started to punch out the paper and realized filling the ornament was going to be very hard to do. Since the paper had a white backing this made for a great snowflake cut out. I decided to glue some of the snowflakes and some carefully cut out Mickey's to the inside of the globe. Through trial and error I found that crafting glue (for foam, wood, or plastic) works best as it dries clear. I used a Q-tip instead of the brush in the glue jar, as that was too messy, to put the glue on the cut out paper. I then put the cut out on the top of my pinky and carefully put it inside the ornament. Each time before the glue would dry I would swirl the glitter around so that it would stick to the sides. Hopefully you can see in this last picture that it turned out great once the glue was fully dry.


While I worked on my Mickey ornament, Crafty Kid was up to her own projects. She really loved using the glitter glue as you can see below. She thought it made everything look nicely "frosted". The glitter glue bottles were a $1 a piece find. Go figure it was her favorite thing after all the money we spent! (LOL) The Epson salt we are still deciding if it's as cool of a "snow effect" as we want. Full disclosure that we originally wanted to make "melted snowmen" but that didn't turn out as nice and easy as what we saw on Pinterest. I might share my "fail" with you in the next blog. (Hence part 2 of Holiday Ornament's coming soon!)


Below are some of the ideas we came up with using what we had on hand. It's always great to save what you can from previous projects. Those yellow flowers and the red cherries are left over from when I made my Mary Poppins hat!


Hope you enjoyed seeing some of the things we made. Stay tuned for Part 2.