Thursday, October 15, 2015

Haunted Mansion Inspired Room


This blog post features the details I put into making my Haunted Mansion inspired room. In this case it happens to be my kitchen since that is where most people hang out when you throw a Halloween party. The pictures below are broken down into sections and I'll share some tips with you. Throughout I'll reference the links to some print outs I found that helped me create the room.


The above picture showcases how easy it is to use things around you to keep costs low. The branches I took from my back yard were already dried out and dying. The roses you see in bottom right picture I already had dried out a while ago. All the frames you see in the picture were on that cut out ledge already I just swapped out the pictures with things I printed out from Pinterest. I chose the original Disneyland entrance sign, the ghost at the organ, and a Madam Leota in the seance scene. I like how the pictures almost look like they are glowing.


Moving on to the other side of the pictures I put some print outs I found on the blog Sugar and Soirees. You should check them out as the pictures don't do justice to how beautifully detailed they are. I happened to have the candelabras from a party I hosted before and then I just added some fake spiderweb to dirty them up. I like how in the dark the spiderweb looks almost like a fog, something hard to capture in pictures.


I have another cut out in between my kitchen and my living room. I bought a bunch of odds and ends at some picker stores that were covered in dirt, which was a plus :) I decided that this ledge was more of a witches theme and added the Double, Double Toil and Trouble print out from Ella Claire Inspired to a frame.


As you can see this ledge was a work in progress. I added creepy cloth to break up the open space between the rooms and then put some fake spiders in the net. I put darker flowers and branches I bought at Michael's in the vase and the wine bottle. Lastly I put spiderweb up on everything trying again to give it the look of fog, which I especially like coming off of the small cauldrons.


I really wanted there to be a strong tie in to the Haunted Mansion so I printed off the transcript and picked some of the seance phrases to write up and put up on the walls. Of course I couldn't leave out the Grim Grinning Ghosts line from the song!


This seance table is my favorite. I found the lamp at a thrift store for $10 and put creepy cloth over it. Next I framed a nicely done art piece of Madame Leota (check pinterest as I lost the original link) and an 8x10 of the "When Hinges Creak" line. I also wanted to honor the Haunted Mansion library by having a few Spell Books and luckily I found a fun printable from The Idea Room


Sunday, September 27, 2015

Creepy Portrait Wall

This year I decided to go all out on the interior of my house for Halloween. I saw an idea on Pinterest for a creepy type of photo wall and wanted to try it out. It was really easy to recreate and you can put a lot of your own touches on it.


All you need are picture frames, even ones you already own, and the time and energy to search out Pinterest or the internet for photos that fit your theme. In my case, half the frames I owned and the other half I got at thrift stores. I probably spent $5.00 total for frames. I used push pins to hang all the frames as they were lightweight. 


As you can see above, and throughout the other pictures, I'm really into witches this year. I liked this picture above and the fact that it printed with a black boarder. I decided to use a dark red scrapbook paper for the background and put it in a larger black frame. It helped give the overall look of the wall a "darker" feel.


Above are some of the frames I used and a closeup of some of the pictures. Check out those twins! They get me every single time I see them! Just loving sisters right? Or something out of The Shining!?


The above picture is my absolute favorite! As many of you may recall, my love of Halloween comes mostly from my Gran Mac. Unfortunately she passed away this spring and so the witches are a tribute to her. She absolutely loved the Wizard of Oz and the Wicked Witch of the West was her favorite character. The photo itself just seemed like something she would really love.

The cool thing about this frame is that I bought it as-is with no glass so it was really lightweight. I just loved all the different layers and colors of the frame. It was perfect for putting a green background to compliment the black and white photo.


Above is the finished project. I will note that the painting of the girl in white to the left was a $10 picker find that seemed so fitting I just had to have it! You will also see that I put a few "scenic" pictures in there for effect, including the outside of the WDW Haunted Mansion on opening day. And if you look really close you might see a few Grim Grinning Ghosts! It's a little hard to take a quality picture of the overall look, but trust me when I say it's amazing in person.

Next up I will get more into the detailed touches of what makes this a WDW Haunted Mansion theme. All I'll say is be prepared for a whole lot of Leota! Stay tuned to see what's in store....

Sunday, September 20, 2015

Creepy Eyes Wallpaper


After a very long time away from blogging, I'm back, and just in time for Halloween!! I've been crafting during the hiatus, I just haven't been sharing it on the blog as we've been a very busy family this year.

I'm not surprised that I had an urge to blog again right around the time I started thinking up ideas for Halloween. As I've mentioned before it is my absolute favorite holiday!

This year the inspiration for my interior decorations is coming from the Walt Disney World Haunted Mansion ride. I have a LOT to share with you over the next few blog posts, but I figured I'd kick it off with a simple and very cost effective craft I call "creepy eyes wallpaper".

Note: I did this by myself within 15 minutes but it is a very kid friendly craft if you have little helpers!


For those looking to recreate this craft you'll be happy to know it cost me a total of $4.50. I got the black tablecloth for $1.50 at Dollar General and the creepy eyes for $2.99 at Michael's. Other supplies you will need include scissors, tape, and a stapler, but you should already have that on hand.


After taking the tablecloth out of it's packaging I hung it on the door and found a crease to cut it from to size it right. Make sure you have extra tablecloth on the sides and the top so you can wrap it around the door frame. The only part you'll want to be cut accurately is the bottom as you won't be wrapping that under. As you'll see in the picture above, I had enough excess tablecloth that i could roll it and staple it on the top corner. This will help keep the tablecloth from sagging. You want it as tight to the door as possible.

You'll also want to make sure you pull it tight around the hinges so that you are able to open and close the door without the tablecloth ripping. For the doorknobs, cut a small hole in the tablecloth and push the doorknob through. Don't forget to also cut a hole for the door jam as well so the door will function properly.

After you are finished taping the tablecloth to the back of the door you can begin to apply your sticker eyes. I found the pack I bought at Michael's had a nice adhesive so I'm not worried at all that the stickers will fall off. On the other hand I was able to gently peel them off and move them if I needed to, although I don't recommend doing that too many times.


Above is the finished product! I hope you like what I created.

I think it's important to point out that the reason I call this a "creepy eyes wallpaper" is because you could easily do this on any wall of your home. I chose to do it on this pantry door because the area I am decorating is my kitchen and I was running out of wall space.... which means next up is a wall of creepy photos you won't want to miss!


Tuesday, February 3, 2015

Candle Holder Cookie Tray


This project was something I've wanted to try for a while. I really wanted to do something like this as dessert trays for my wedding. The few times I went to the thrift store last spring I wasn't able to find the right plate or I couldn't find a candle holder that was heavy enough. By chance, a couple months ago, I found two silver candle holders with a nice base and some decent weight to them. Not too far away, on the same shelf, I found matching China with a pretty blue flower pattern.

I used my hot glue gun on high heat for this project. The truth is I had a "win" and a "fail". I was able to get one of the plates to stick to the candle holder and maintain a grip. The other one wouldn't no matter how many times I tried. (Good thing about hot glue is if it won't stick it's pretty easy to peel off.) 

I'm not really sure what the solution is... possibly gorilla glue? or super glue? If I ever find the time I'll try it again. If this project interests you there are lots of other "pins" on Pinterest that might be able to provide additional insight.

Sunday, January 18, 2015

Valentine's Day Cards


I warn you in advance that this is going to be an entry where I gush about how proud I am of Crafty Kid. Everything you see in this entry she made herself, from start to finish, with no help from any adults. 

I was out all day yesterday and came back to find these beautiful cards and a wonderfully laid out crafting work area. Talk about being impressed! She even had my 13-year-old stepson helping her because she showed him how to use the Cuttlebug embosser and he loved it. If that isn't enough, today I showed her how to use Photo Grid and she made the collage image you see above for the blog :)


As you can see she had her crafting area laid out nicely. The biggest problems any crafter faces is the issue of time and space. Nobody wants to waste a lot of time setting things out or cleaning them up. Or waste even more time digging through things to find what they need. And most people have to use their kitchen table (like we do) and so you have a limited work space. I taught her to create work stations for the cards so that she knows where everything is and can easily go from one step to the next. 

She set up the following stations: Paper, Cutting, Embossing, Gluing, Embellishments, and Stamping. Everything was laid out on the kitchen table lining the perimeter, like a horseshoe, and she worked off of the clear space in the center.


Obviously taking time to set up was not her favorite thing in the beginning. She just wanted to get right down to crafting, and this always left a big mess. Scissors lost under paper, embellishments on the floor, no table space when you needed to emboss. Of course that lead to frustration, and let's face it, at 11 you kind of just give up on it at that point. I was then stuck cleaning up everything to make sure it got back in it's place, which could take up to 30 minutes. (Again, goes back to knowing where things are so you don't waste time digging through everything.)

So this breakthrough she had is a big win for everyone! She's productive and happy making the cards, and it took me all of 5 minutes to get everything back where it belonged the next day.


As far as card design, it was her idea to buy the doilies a few months back. Look at how creative she was with using them! I was also super impressed that she mixed and matched so many techniques. (Layering paper & doilies, stamping, embellishments, embossing, shape punching)

Making these cards takes time and patience. I'm proud of her for following through with her creativity and learning at the age of 11 how important it is to be organized.

Wednesday, January 7, 2015

Holiday Ornaments: Part 2

So the Holiday season has come and gone yet again. I may have been quiet on the blog the last few weeks, but we sure have been busy crafting, party planning, and decorating! I'll have lots to share in the coming weeks.

I figured it would be best to start with the second half of our ornament project. I had held back on blogging about them because the Disney themed ones were a gift for my family. Crafty Kid had a great time making these and I was glad I came up with the idea because they were easy to make as well. We really loved making the spiral paper ornament! It was a lot of fun to do and such a beautiful result.

For this craft you will need the following:
  • Double sided scrapbooking tape
  • Mickey scrapbooking paper (or character of your choice)
  • Paper Slicer or sharp scissors
  • Q-Tip or a pencil
  • Styrofoam or Epson salt (if you want to add "snow")

The first round of ornaments Crafty Kid and I were having trouble deciding what looked best inside the ornament. Some of our issues were that in order to get bulkier items to stay we needed glue, which was difficult to use due to the small opening on the top of the ornament. The paper items often just fell on their side and again gluing them to the wall of the ornament was a bit of a process. Not to mention only one side of the paper had a print on it so if it flipped over it just looked like white paper.


We had some scrapbook paper with larger sized Disney character faces on it, and luckily before we went to use it I had a breakthrough. I realized we could glue two of the characters together so there was a design on both the front and the back. In the ornament above we cut out two of the Mickey faces and glued them together with double sided tape. Then we rounded off the edges with a small, sharp pair of scissors.


We then put the double sided Mickey paper inside the ornament. We were super happy to see it stood up inside the ornament. We had some packing styrofoam I saved, so we broke it into pieces to put inside the ornament to create a snow globe effect. Crafty Kid really LOVES her glitter glue so she put some drips of it on the outside of the ornament.


For the Minnie and Pluto ornaments above we followed the same initial steps. Once the Minnie paper was inside the ornament we used Epson salt as snow and Crafty Kid dotted the top with white glitter glue. For the Pluto ornament she decided she wanted to dot the entire ornament and leave just the Pluto paper inside.


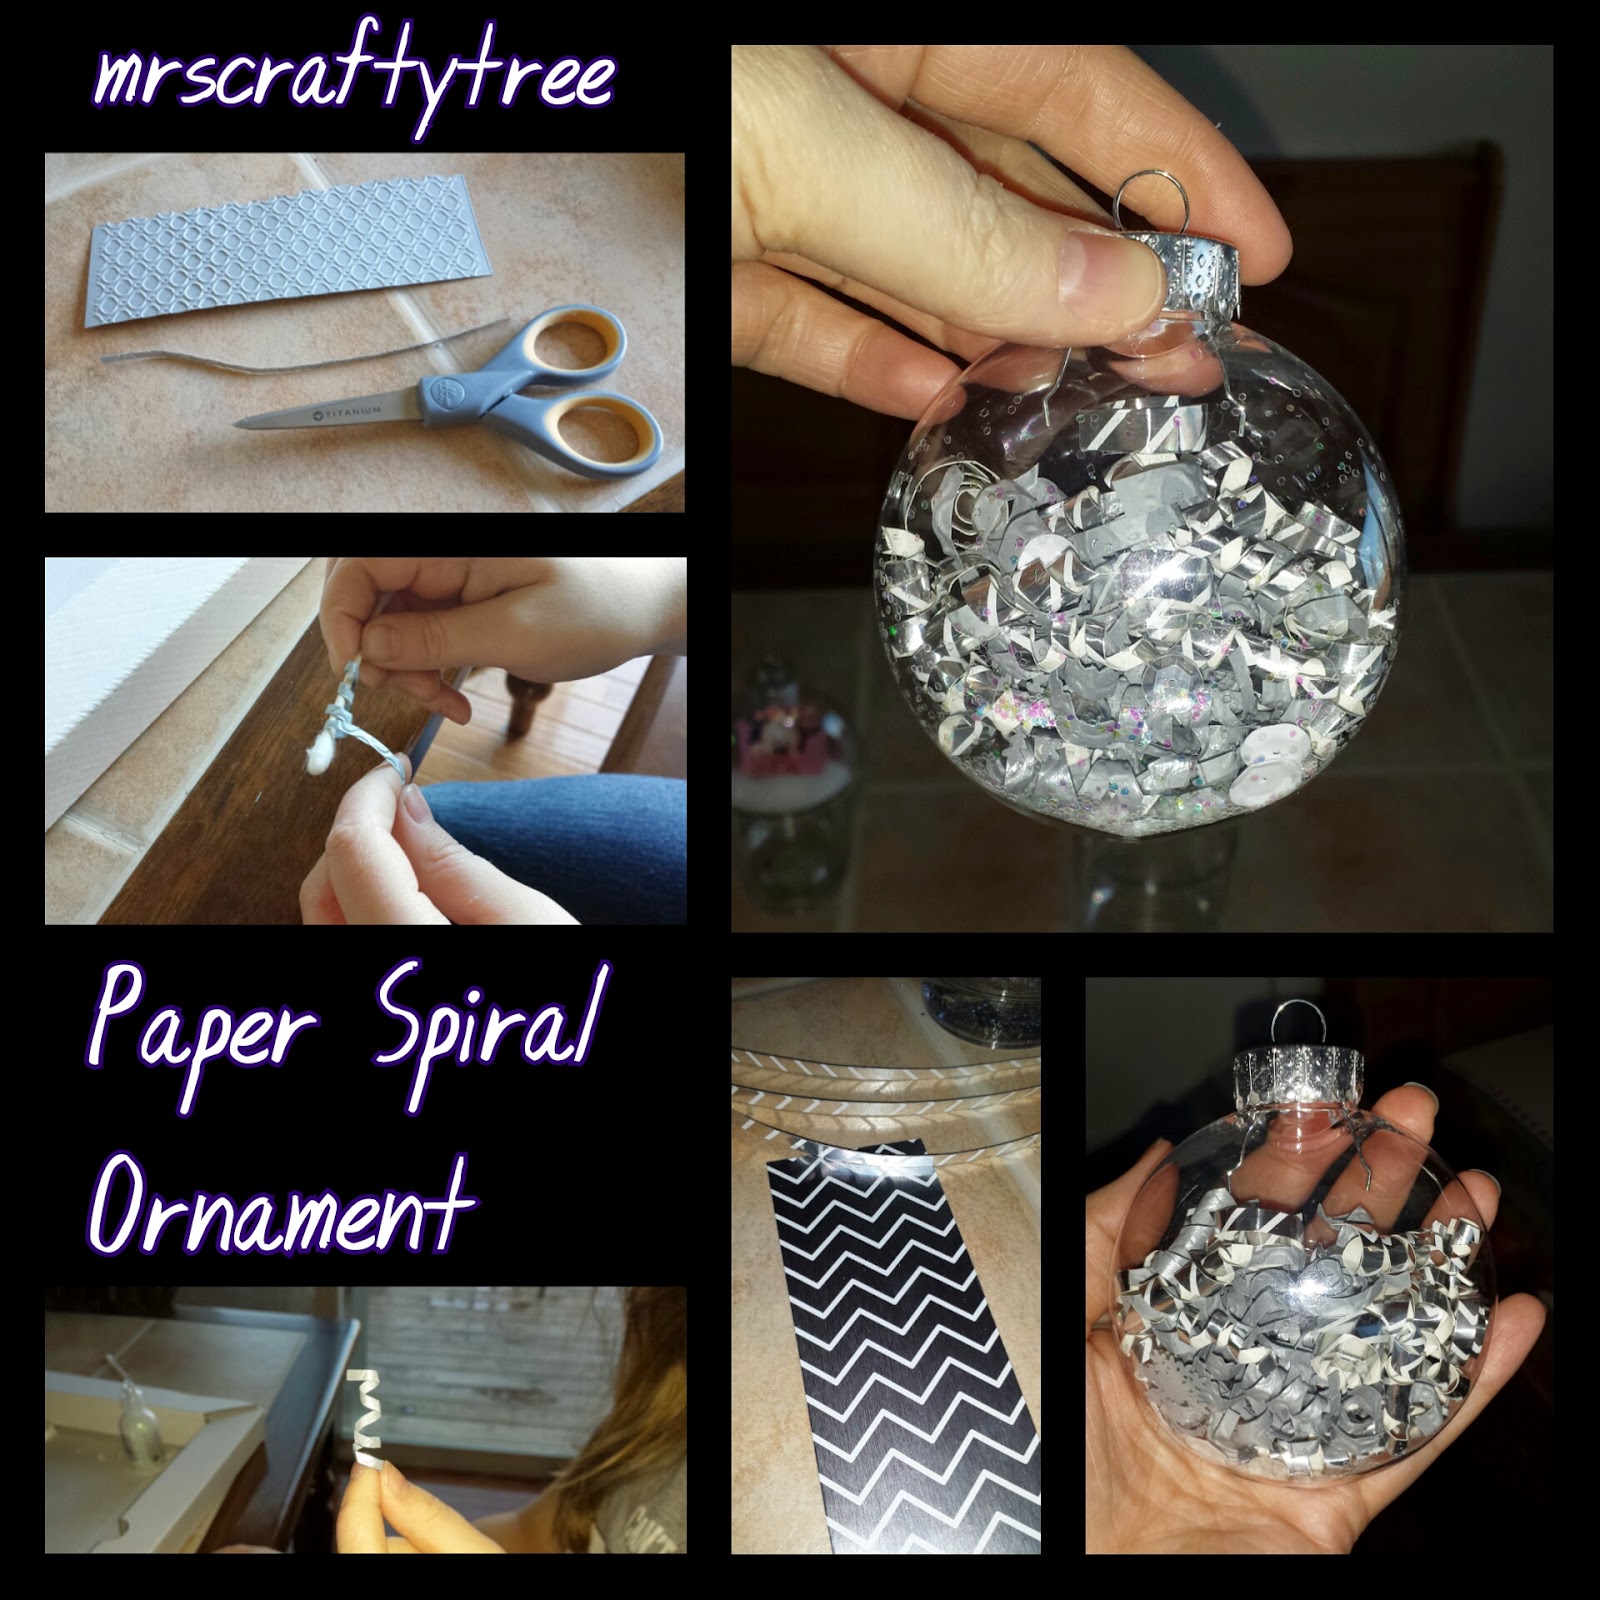
This ornament above is hands down my favorite! We were messing around with some smaller strips of scrap paper and came up with the idea to spiral it. I showed Crafty Kid that she could use a Q-Tip to roll up the paper and she ran with it! We used a couple different shades of silver paper. I cut the thin strips and she rolled them up. Some we stuck inside at that length, others we cut to different lengths. It came out so pretty.

Note: We put some glitter and flat white gems inside. I don't think it's necessary. You can barely tell unless you look very closely at the bottom, which is where they sank to. That's the beauty of the paper is it's so light as a spiral it has a floating effect.


So as promised from my previous Holiday Ornaments: Part 1 blog, above is my melted snowman Pinterest fail. Mine, of course, is the one in the right hand corner. Honestly it doesn't look as bad as I remember, but it still wasn't as cute as what I saw on Pinterest. 

Just goes to show that not all craft projects are as easy to replicate as you think. That's why when I blog I do my best to go step by step. I hope it's helping those reading with some ideas and inspiring you to craft on!